Showing posts with label recipe. Show all posts

Monday, June 25, 2012

Baked squash blossoms

I've wanted to make squash blossoms ever since I found out they were a thing. I remember hearing Sookie St. James on Gilmore Girls rave about people expecting her stuffed fried squash blossoms and thinking, "I don't know what that is, but it sounds delicious." I've seen recipes here and there on the food blogs I follow, and they always looked so pretty. I've just never actually been able to find squash blossoms. So when I saw them at the farmers market on Saturday at $2 for a dozen, I jumped at the chance to finally try them. I baked half of them last night, and sometime this week, I'm going to try a dessert recipe I found.
photo by storeyland
Ingredients
6 squash blossoms

Filling:
1/2 c ricotta cheese
1/4 c parmesan cheese
1 egg
1 T fresh basil, chiffonade
salt and pepper, to taste

Coating:
1 egg
1 T water
Panko bread crumbs

Directions

  1. Preheat oven to 400 degrees. Cut off the stem of the blooms if necessary.
  2. Stir together all the filling ingredients with a fork until combined. Carefully spoon mixture into squash blossoms. How much you use will depend on the size of the blooms, but it will probably be around a tablespoon or two. Twist the tops of the petals together to close.
  3. Whisk together the water and eggs and brush onto the outside of the blooms, coating all sides. Carefully roll the blooms in the panko crumbs and arrange on a greased baking pan.
  4. Bake at 400 degrees for approximately 25 minutes.

-Katy

Thursday, June 14, 2012

Sauteed squash

I improvised this recipe Tuesday afternoon when I was short a vegetable for my son's lunch, and it turned out really well. My son really ate it up, which makes me glad since his daddy doesn't like squash. I made this with yellow squash, but it should work with zucchini, pattypan, or any summer squash.

Ingredients
1 squash, cut into 1/8" slices
1/2 T butter
1/2 T olive oil
1/2 t dried thyme (fresh would be better)
a splash of red wine vinegar (I would have preferred lemon juice, but it's what I had)
salt & pepper, to taste

Directions

  1. Heat a 10"-12" saute pan over medium high heat. Add butter, olive oil, squash, and a bit of salt and pepper. Stir or shake to get squash as close to a single layer as you can.
  2. Leave it alone for at least 30 seconds. Toss to flip or use a spatula to flip if you aren't comfortable tossing it.
  3. Repeat the process of leaving it alone and flipping until you get some nice brown spots on your squash.
  4. Add thyme and vinegar or lemon juice. Stir, shake, or toss until the vinegar or lemon juice evaporates. Adjust the seasonings to taste.


-Katy

Tuesday, May 22, 2012

Corn in a toaster oven? Who woulda thunk!

May has been hot in my neck of the woods. There have been a few days where our air conditioner just couldn't keep up, and it's supposed to be over 100 degrees on Thursday. (Ouch!) So, I'm trying to avoid turning on my oven as much as possible. If I use the oven on one of those days where the air conditioner is straining, the house doesn't cool down until well after sunset, and who wants that?

Lucky me, my husband got me a toaster oven for Mother's Day. (Really, it's okay. We've been talking about how much we wanted one for years. I mean, literally, years.) We've had a rough month with illness running its way around our family, so last night was the first time I used it, and I really went all out. No toasted bagels or frozen waffles for me. No, what's the first thing I made in my toaster oven? Roasted corn. And, it turned out great. I am so proud of my little toaster oven.

Directions

  1. Soak the corn, in husk, in salt water for several hours. If you can't submerge all the corn, put the end where the silk sticks out on the bottom. I don't know if it actually works, but I imagine that capillary action brings the salt water up into the corn through the silk. Even if it doesn't actually work that way, I've always gotten good results by doing it like that.
  2. Place the rack in your toaster oven on the lowest slot and set your toaster oven to bake at 350 degrees. Take the corn out of the water, and using kitchen shears, snip off the silk hanging from the top and any loose bits of husk or parts that stick out.
  3. Put the corn on a small pan and place on the rack in the toaster oven. Bake for 30 minutes, turning once halfway through.


-Katy

Thursday, May 17, 2012

Tip: Use Naan as pizza crust

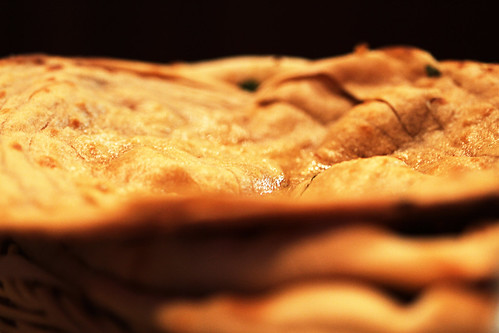
I saw an interesting tip in the Publix ad the other week. Next to the picture of Tandoori Naan on sale was the suggestion to use Naan to make pizza. I thought it sounded like an odd mix of cuisines, but I thought it was worth a try. I bought a package of two of the garlic Naan, as well as some fresh mozzarella and sauce. It was delicious, and they were a good size for individual pizzas.

Photo by MoHotta18
 I've made this twice now, and I have a couple of tips I've learned from the experience. You'll want to use less sauce than a pizza made from dough. The sauce doesn't absorb as much, so the sauce is more likely to form a slick under your cheese. Nobody likes to take a bite of their pizza and have all the cheese slide off. Second, put the Naan directly on the rack in the oven or put it on a cooling rack and put that in the oven for easier removal. If you put it on a cookie sheet, the bottom doesn't crisp up and you end up with a pretty floppy pizza. With the bottom unshielded from the heat of the oven, the bottom crisps up nicely without burning and the crust holds up better to the toppings, which makes the pizza easier to eat.


Naan Pizza

Ingredients
2 pieces of garlic Naan
Pasta or pizza sauce
Fresh mozzarella, shredded
Other toppings of your choice (i.e. red pepper flakes, basil, pepperoni, etc.)

Directions
Build your pizza on a peel or cooling rack depending on whether you will cook it on the oven's rack or the cooling rack. Preheat the oven to 400 degrees.
Add desired toppings to Naans and transfer to the center rack of the oven. Rather than timing the pizza, keep an eye on it, and pull it out when the cheese gets to your preferred point of brown and bubbly. (It's nice that you don't have to make sure the crust is cooked.)

- Katy

Friday, May 4, 2012

Holy Moley, Guacamole!

I saw a recipe in my inbox the other day for "Healthified Guacamole." Curious, I clicked on the email to see what they did to make guacamole healthier. I was thinking it was pretty healthy to begin with. I mean, the avocado is kind of high in fat, but it's all good healthy fat, and there are plenty of nutrients in guacamole as well. Lo, and behold, the recipe I saw before me was simply a standard recipe for guacamole. What kind of guacamole had the writers of this email recipe been eating? (Though I admit, I was glad to see that hadn't done something weird to mess with guacamole. I mean, let's just admit it. A good batch of guacamole is basically perfect food.)
guacamole
photo by stu_spivack

I love making guacamole at home. It's so hard to find a good store bought guacamole and generally cheaper to make it at home, especially right now when the grocery stores are all having their Cinco de Mayo sales. If you're looking for a good store bought guac, I like Trader Joe's the best and Wholly Guacamole the second best. If you're looking to make your own, read on. My version is adapted off of this Alton Brown recipe. I do a couple of things to it that may make it inauthentic, but I like it, so I don't care.

Ingredients
3 avocados
1 small lemon
1/2 medium red onion, diced
2 plum tomatoes, diced
2 cloves garlic, minced
1 small handful of cilantro, chopped (should come to about 1 T after chopping)
a few jarred jalapeno slices, minced
salt and pepper, to taste

Directions
1) Cut the avocados in half and remove the seeds. Cut the avocado in cubes by scoring a grid into the avocado through to the skin and then scoop out with a large spoon. If the avocado is nice and ripe and soft as it should be, your cubes won't be perfect, which is fine. I like to think of the cubes of avocado in my guacamole as the bread cubes in a bread pudding. Some will remain fairly intact and some will break up completely to make a nice balance between creamy and chunky.
2) Dump avocado pieces into a large bowl and squeeze the juice from the lemon onto them and toss to coat.
3) Add the onion, tomatoes, garlic, cilantro and jalapenos, and stir to combine. Season with salt and pepper to taste. If you can wait to eat it, let it sit for about an hour to let the flavors meld.

For variations, you can mash the avocado before adding the rest of the ingredients. You can use a lime instead of a lemon. You can also add some spices such as cayenne, cumin, or chili powder. If you're looking to be more authentic, leave out the jalapenos.

-Katy

Friday, April 20, 2012

Hunger Games, indeed

This brilliant person came up with a recipe for Katniss's favorite dish from The Hunger Games, lamb stew with dried plums. It looks absolutely delicious and incredibly rich, just as it should be for a Capitol dish. I can understand why Katniss took a liking to it. There are so many mentions of delicious sounding food in that book; one could write an entire cook book based on the trilogy. (Dear anyone considering doing this, please omit any Greasy Sae dishes.)

After seeing this, I must say I'm a bit inspired. I'm feeling like taking a stab at the chicken and oranges in a cream sauce, myself.

-Katy
Bookmark and Share

Thursday, April 19, 2012

I actually made something I pinned!

Indeed, it's the third recipe I pinned that I actually made. I'm so proud of me. I made Pasta with Cauliflower and Sausage from The Kitchn. I loved it, and my husband, who hates cooked cauliflower (but likes it raw, go figure), loved it as well. I made a half recipe, and there were still enough leftovers for both of us to have a meal of leftovers (and for me to cut up a little to give to the little one. He liked the cauliflower. He makes Mama proud.).

Sauteing the cauliflower really brings out the sweetness of it, and it goes really well with the slight spice of the mild italian sausage. I thought the flavors balanced really nicely, and it had a nice sweetness to it without having the over sweet taste you can get from a jarred sauce. Plus, I cannot resist fresh mozzarella. I like to buy the little balls to snack on in lieu of string cheese.

I used onions instead of shallots (because it's what I had around) and parmesan instead of bread crumbs (because I was too lazy to make breadcrumbs). All in all, I'd say it is definitely a repeat.

-Katy
Bookmark and Share

Wednesday, November 12, 2008

Bierrocks

I really need to get better at taking pictures of what I make at home. If I took pictures of every meal I made, I'd have an endless supply of posts. Maybe if I take a picture of these beautiful bierrocks next time, I can post it at the top of this currently pictureless post and you can go, "Oh my, those look tasty. I must make them now." But for now, you must simply take my word for it that these things are yummy. I make my own dough for these, but by all means, feel free to use frozen dinner roll dough. The operative word here being dough, as in uncooked. I made the mistake of not carefully reading the label of frozen dinner rolls and ended up purchasing the "heat and eat" variety instead of the uncooked stuff. I've also made these with crescent rolls from the tube. If you do that, use two triangles and pinch together the perforated parts. (It just now struck me that perforated bread dough is very strange.)

Bierrocks

Ingredients:
for the dough
2 c flour
1 tsp instant yeast (approx half a packet)
2 T sugar
1/4 t salt
1/2 c milk
2 T butter
1 egg, beaten

for the filling
1/2 lb ground beef
1/4 to 1/2 of a head of green cabbage, shredded
1/2 of an onion, chopped
salt and pepper, to taste
cheddar cheese, to taste, optional

Method:
1) Melt the butter in the microwave, then add sugar, salt, milk, and the egg. Whisk to combine. Heat the milk mixture until warm, not hot. Water over about 120 degrees will kill the yeast.
2) Add the ingredients to a large bowl (preferably the work bowl of a stand mixer with the paddle attachment on it) in this order: 1 c of flour, yeast, milk mixture, 1 c of flour. Stir with the paddle of your mixer or a hefty spoon until it forms a ball. If it will not form a ball, add more flour.
3) If you have a dough hook for your stand mixer, spray it with non-stick spray and run it on your mixer on a slow setting for about 10-15 minutes. If you do not have a mixer, turn the dough out onto a floured surface and knead it. (Stretch it out by pushing it against the surface, fold, turn, repeat.) At the end of either method, you should be able to stretch a small piece of dough until you can see light through it. This means you have developed enough gluten to make the dough strong and elastic, which will give you a nice chewy texture.
4) Put a little bit of oil in a large bowl and toss your ball of dough in it. Leaving the dough in the bowl, cover it loosely with plastic wrap and let it rise in a warm place until doubled in size - about an hour.
5) If you started with ready-made dough, start here. While your dough is rising, brown the ground beef over medium-high heat. Once there is no pink left in the beef, add the shredded cabbage, onion, and salt and pepper. Stir to combine. At this point, you can deglaze the pan if you want. Turn the heat to low, cover, and simmer for at least 30 minutes, stirring occasionally. The cabbage should be completely wilted and the onions soft.
6) Once you reach this point, you can stir in the cheddar and preheat the oven to 375 degrees.
7) Cut the dough into 12 equal pieces, and flatten the pieces into squares that are about 3"x3".
8) Place a tablespoon of filling in the center of each square of dough. Gather up the corners of the square and pinch the dough together to seal.
9) Place the roll, seal side down, in the cup of a standard-sized muffin tin. There is no need to grease it.
10) Once the muffin tin is full of rolls, place the tin in the oven and bake (at 375) for 15-20 minutes. The rolls should be golden brown on top and should spring back when you poke them.


-Katy


Bookmark and Share

Friday, October 17, 2008

Recipe: Bison Chili

This one doesn't get a picture because--let's face it--chili is ugly. It's just a lumpy mass of brown, but man, is it tasty. Chili is one of those dishes that's incredibly versatile. Beans, no beans, tomatoes, no tomatoes, ground meat, cubed meat, beef, lamb, pork, or any combination, chili powder, fresh chiles, any or all of the above. I like to use bison because it's lower in fat and cholesterol than beef, and I also find that the flavor of the meat shines through better than a lean ground beef.

Ingredients
1 lb ground bison
1 (15 oz) can diced tomatoes
3/4 cup black beans
3/4 cup kidney beans
1/2 cup salsa - your choice of heat level
1 chipotle pepper - dried or in adobo sauce
1 Tbsp chili powder
1 pinch cumin
1 pinch cayenne pepper
1 (12 oz) bottle or can of beer - I like lager or wheat beer best - if it's too stout, the beer flavor will overpower the other ingredients
3 cups stock and/or water
1 small can tomato paste

Method
1) Turn crock pot on low heat.
2) Brown bison over medium-high heat. Drain and add to crock pot.
3) Add all ingredients except tomato paste to the crock pot and stir to combine.
4) Cover and cook for at least 4 hours. This is good to start before you leave for work so you have dinner ready when you get home. Well, almost. There's one more step.
5) Stir in the tomato paste before serving.

-Katy


Bookmark and Share

Thursday, August 7, 2008

Ice Cream Basics: The Custard Base

I've been on an ice cream making kick lately. I can't help it. It's summer and it's hot, and my ice cream maker is still relatively new. I find that the best ice cream starts with a custard base. It doesn't freeze up as hard as a base with no eggs in my experience, and I also find it has a smoother, creamier mouthfeel.

Sweet Cream Custard Base

Ingredients:
1 qt half and half
1 c sugar
4 eggs (or 8 egg yolks)
a pinch of salt

Method:
1) Stir together 2 c half and half, sugar, and salt in a saucepan over low to medium-low heat until the sugar is completely dissolved.
2) Whisk together the eggs and slowly whisk in the half and half mixture until you've mixed in about a third, then pour it back into the saucepan. This is called tempering and will prevent the eggs from scrambling when added to the milk.
3) Cook over low to medium-low heat, stirring and scraping the bottom constantly until the custard thickens. It should coat the back of a spoon, and when you run your finger across the spoon, it should leave a track that the custard does not run into.
4) Once you've reached the correct consistency, strain the mixture into the rest of the half and half to stop the cooking.
5) Either chill over an ice bath or in the refrigerator overnight. The colder the mixture is before you freeze it, the better. You will have a better consistency because the ice crystals will be smaller.
6) Freeze according to manufacturer directions on your ice cream maker. I have a Cuisinart ice cream maker with a freezable core (it should be in the freezer at least 24 hours before freezing). I let it go for at least 20 minutes before I check it. I look for the ice cream to be heaping up in a spot before I call it finished. It should be the consistency of soft serve.
7) Put the ice cream in the container of your choice and put it in the freezer. It should be at the right consistency in a few hours.

Variations:
Vanilla -
steep a vanilla bean in the milk and sugar at the beginning of the process, or add a teaspoon or two of vanilla extract just before freezing.
Chocolate - add 1/2 c of cocoa powder to the half and half before adding sugar and salt. Let it get completely incorporated before adding sugar and salt.
Mint Chocolate Chip - steep up to 3 cups of mint leaves in the half and half and strain before adding sugar and salt (I'd suggest using more like 1 cup. I find 3 cups far too minty, but this is the amount I've seen in most recipes), or add a teaspoon of peppermint oil just before freezing. Add the chocolate chips near the end of the freezing process. Keep the chocolate chips cold.
Strawberry - Halve the above recipe. Use 1 c half and half and 1 c cream instead of 2 c half and half. Once the custard is ready, add it and a 10 oz package of frozen strawberries or a pint of fresh, hulled strawberries to a blender and puree.

-Katy

photo via Flickr user laffy4k


Bookmark and Share

Tuesday, July 29, 2008

Recipe: Fried Rice

Most people think of fried rice as a side dish, but I am here to present an argument for its inclusion as a main dish. If you add meat to it, you have all the elements of a meal all rolled into one: protein, grains, and vegetables. And even if you don't have the meat, you still have eggs for your protein. And if you're a vegetarian, you can always use tofu. See? It's not just a main dish. It's a whole meal!

Fried rice is a pretty versatile dish, so it's perfect for using up leftovers. In fact, it actually works better with leftover rice than with fresh rice (though I rarely make it with leftover rice because the only other ways we eat rice is in etouffee or red beans and rice). I usually use onions, carrots, and peas for the veggies, but just about any combination would work, and I would encourage you to experiment. Now, onto the recipe.

Ingredients:
canola oil
2 cloves garlic
1 small to medium onion, diced
1 medium to large carrot, quartered and sliced (1/8" thick)
3 cups cooked long grain white rice
sesame oil
2 eggs
1 t ginger
frozen peas
soy sauce

Method:
1) Saute garlic, onion, and carrot over medium to medium-high heat in a little bit of canola oil (just enough to coat the pan) until nearly tender, about 6-8 minutes.
2) Add rice and stir to incorporate. You're not trying to put color on the rice, just heating it up and getting it mixed in with the vegetables.
3) Make a well in the rice. Pour sesame oil and then eggs into the well. Stir the eggs until they are partly scrambled, and then incorporate them into the rice.
4) Add ginger and frozen peas and stir until the peas are heated through.
5) Add soy sauce to taste.

-Katy

Bookmark and Share

Monday, July 28, 2008

Recipe: Double Berry Pie

"You Can Convince Yourself It's Healthy" Double Berry Pie

Crust:
1/2 c whole wheat flour
3/4 c all-purpose flour
1/2 tsp salt
1/3 c butter
1/4 c ice water

Filling:
2 1/2 c strawberries
2 1/2 c blueberries
1/2 c sugar
3 Tbsp cornstarch

Topping:
3/4 c rolled oats
1/2 c brown sugar
1/2 tsp cinnamon
dash salt
2 Tbsp butter

1. For crust, cube butter and combine with flours and salt in a food processor until mixture resembles coarse crumbs. Add water a little bit at a time until dough comes together. It may not necessary form a dough ball in the food processor, but it should hold together if you squeeze it.
2. Chill dough in a plastic zip top bag for at least 30 minutes. Roll out dough in the plastic bag. Cut off 3 sides and invert over a pie pan and press into place. Prick crust with a fork and cover with a double layer of foil. Blind bake crust for 10 minutes at 400 degrees.
3. For filling, mix together all ingredients. I would suggest sifting the cornstarch into the sugar and berries to help prevent cornstarch clumps in your pie.
4. For topping, mix together oats, brown sugar, cinnamon, and salt. You can also add a pinch of nutmeg if you'd like. Cube the butter and cut into the other ingredients until mixture (excluding the oats) resembles coarse crumbs. I start by using my fingers and then cut in the rest of the butter in with a fork.
5. Once the crust comes out of the oven, turn it down to 375 degrees. Remove foil, add filling, and top with oatmeal topping. Bake at 375 for 1 hour and 15 minutes. Let cool at least 1 hour before eating.
Bookmark and Share

Recipe: Granola Bars

Granola Bars

3 c rolled oats
2 c nuts (I used almonds and pecans and crushed them with a mallet)
3/4 c shredded coconut
6 T brown sugar
6 T maple syrup
1/4 c vegetable oil
3/4 t salt
1 c raisins

Mix together oats, nuts, coconut and brown sugar in a large bowl. Set aside.

In another bowl, mix together maple syrup, oil, and salt. Mix into dry ingredients.

Spread mixture onto two sheet pans and bake in a 250 deg. oven for 1 hour and 15 minutes, stirring every 15 minutes.

Remove to a large bowl. Add raisins and mix until evenly distributed.

To make bars:
1/4 c vegetable oil
1/4 c brown sugar
1/4 c honey
1/3 c peanut butter
3 1/2 c granola
6 oz. chocolate chips

Mix together first four ingredients. Microwave for two minutes, stirring halfway and at the end. (If I were making this again, I'd probably leave out the oil.)

Mix into the granola. I mixed the chocolate chips in at this point, so they melted. Wait for it to cool some if you don't want this result.

Press into the bottom of an 8"x8" square pan. I used the back of a spoon. You can use your hands, but you'll want to grease them up first.
Bookmark and Share

Recipe: Chicken Stock

Stock is a strange dichotomy for me. It's really quite simple to make, but it makes me feel like an accomplished cook when I see water turn into a rich, golden liquid because of something I did. It might also have something to do with the fact that when I make stock, it means I have cooked with a whole chicken, which means I have cut it into pretty little pieces of drumsticks, thighs, and boneless-skinless chicken breasts. This is a somewhat complex process, so I won't get into it now. But if you'd like to make your own stock without starting with a whole chicken, I would suggest using chicken wings or chicken feet. Most supermarkets will not have these on display, but you should be able to get them if you ask the butcher. In fact, they will probably be glad to get rid of them. If you roast a whole chicken, you can also use the leftover bones for the stock. The bones from a roasted chicken will yield a slightly different result. The stock will be darker and a bit more flavorful than a stock that starts with raw bones. They both have their place in the kitchen.

Chemistry 101
When you make stock, you are infusing the water with the flavor of chicken and your choice of vegetables, yes, but mostly you are working magic with the bones. See, bones are full of collagen, and when you cook collagen slowly with a wet cooking method, the collagen dissolves and becomes gelatin. Gelatin, the thing that makes Jell-O possible, gives stock a rich, meaty mouthfeel. It's also why soup turns into goo when you put it in the refrigerator.

Basic Chicken Stock

Ingredients:
1 chicken carcass, broken down into small pieces or 1 lb of chicken wings and/or feet (cut wings at joints, cut claws off feet)
2 carrots, cut into large chunks
2 celery stalks, cut into large chunks
1/2 onion, layers separated
Optional: herbs (1 bay leaf, a sprig of thyme, a couple sprigs of parsley, and a couple peppercorns would be what I suggest. I usually leave them out. I prefer to not risk the clash of seasonings when I put stock in a dish. Some people also put salt in their stock, but I do not. That's mostly a personal preference, but if this stock is ever going to be reduces, salting it would be a bad idea.)
Water

Method:
1) Toss all ingredients into a large pot and pour in enough cold water to cover everything.
2) Put the pot on a burner set to medium-high, and let it come to a boil.
3) Once it has come to a boil, turn the heat down to medium-low. You want it to just be at a simmer - bubbles slowly coming to the surface.
4) Let it simmer for at least 2 hours. 4-8 hours is ideal. Check on it every once in a while to make sure it hasn't come to a boil and to remove any scum that has risen to the surface with a slotted spoon or a wire strainer.
5) When the stock is done, fill a large bowl or your sink with ice and water and place a container big enough to hold the stock in the middle. This step is not completely necessary for a batch this size, but it is reassuring from a food safety standpoint. Also, if you make a batch much larger than this, putting hot stock into your refrigerator will raise the temperature of the fridge into the "danger zone". Letting the stock cool on the stove top is also a bad idea, therefore, ice bath.
6) Place a fine strainer on top of your container, and ladle stock over the strainer into the container until the water level in the pot is low enough that you feel confident pouring the stock from the pot. You can also siphon it, but be careful not to burn yourself.
7) Stir the stock to help it cool quickly, then cover and store in the refrigerator.
8) The next day, there should be a layer of fat on the top. You should be able to just pull it off. Now your stock is done. Use it within the next few days, or freeze it for up to 3 months.
Bookmark and Share

Recipe: Strawberry Sorbet

See over there? That's my first foray into the world of food photography. Not bad for a first attempt if I do say so myself. (Though I have to admit to a little post-camera tweaking.) That lovely looking strawberry sorbet you see above is what I made tonight. It's so so yummy. And it's really not that hard . . . assuming you have an ice cream maker. It would be rather difficult if you didn't. I have this one, and I very much enjoy it. To get it ready for the sorbet, the core has to go into the freezer the day before.

In the interest of full disclosure, I have to tell you that I used some leftover strawberries that were in my freezer as well as some in my fridge. So the amount on the strawberries is purely an estimate. However, I think it's pretty close thanks to the gauge on the side of my blender.

You'll notice the presence of alcohol in the sorbet. Don't worry. You can't taste it. It's just there to lower the melting point of the sorbet and therefore help keep it from freezing into a strawberry-flavored block of ice. If you wanted to be able to taste the alcohol you add, I would recommend orange liqueur or brandy. If you use those, I would up the alcohol content a tad and lower the sugar content to keep it from becoming too sweet and preserve the texture. Other ways to tweak? Lemon juice and/or zest or balsamic vinegar.


Strawberry Sorbet

Ingredients:
1.5 pints strawberries
2/3 c sugar
2 Tbsp vodka

Method:
1) Cut the leaves off the tops of the strawberries and slice in half.
2) Put all ingredients in a blender and puree until smooth. If you wish to, you can strain it. (I didn't.)
3) Start up your ice cream maker and pour the base from the blender into the ice cream maker.
4) Freeze according to the manufacturer's directions. I let mine run for 15 minutes.
5) Put into a container and leave in the freezer for at least 3 hours before serving. Or eat it straight out of the ice cream maker if you just can't wait.
Bookmark and Share

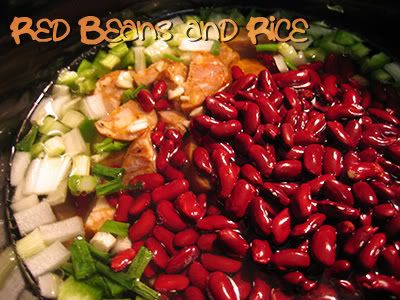
Recipe: Red Beans and Rice


Let's start this out with a little lesson in Creole cooking, of which red beans and rice is a part. Apparently, it is not Cajun. Personally, I find Cajun and Creole nearly indistinguishable since they share very similar flavor profiles. Does that make me a bad
southerner? Perhaps. I can, however, tell you a bit about the history of the two cuisines. Cajuns - or Acadians - came from Canada. They have French roots, and therefore Cajun cooking is French cooking
adapted to locally available ingredients. Hence you have the ubiquitous presence of roux (a thickening agent based on flour and butter or oil), stock, and their adaptation of mirepoix called the
holy trinity. Mirepoix consists of two parts onion, one part celery, and one part carrot. The holy trinity simply replaces the carrot with bell pepper.

Creole cooking originated in New Orleans. It also uses French techniques, but blends other European, African, and American influences. It also has different origins in that Cajun cooking
originated from peasant food while Creole cooking originated with aristocrats.

Along with roux, chicken stock, shellfish stock, onion, celery, and bell pepper, there are several ingredients you will commonly find in Cajun and/or Creole cooking. These include garlic, green onions, cayenne pepper, bay leaf, shellfish (esp. crawfish (crawfish etoufee
is friggin yummy)), smoked sausage (esp. andouille), and white rice. You can pretty successfully fake a Cajun/Creole dish by including the holy trinity and some of the other ingredients.

Now let me say that I am not an expert on these cuisines. I've learned what I have by looking for recipes to satisfy the tastes of my Southern boy of a husband and talking to my history buff and Louisiana-living father in law.

Now that the background is over, let's get to the cooking.

Traditionally, the beans, rice, and sausage are cooked separately and combined at the dinner table, but I don't do that. I mean, why dirty up three pots when you can dirty up just one? So I throw it all in the Crock Pot. This is also often made with a pork bone or ham hock, but I don't do that either. I find the andouille sausage imparts plenty of meaty flavor to the beans. If you are a vegetarian, I would suggest adding some liquid smoke or smoked meat substitute as the
smoky flavor of the sausage is very important to the dish. This makes a ton, and it's even better as leftovers, so freeze it for later.

Ingredients:
1 c diced onion
1/2 c diced celery
1/2 c diced bell pepper (color doesn't really matter, I use green
because it's cheap)
1 clove garlic, minced
1 bay leaf
2 c kidney beans
2 links of andouille sausage, quartered and cut in 1/2 inch slices (I
want to say that's 4 oz)
1 q chicken stock
2-4 c water
salt and pepper, to taste
pinch of cayenne pepper
1 c uncooked long grain white rice

Method:
1. Rinse the beans and pick out any non-bean matter. I find that
there is no need to soak them since they will be cooking for so long.
2. Toss everything but the rice into a slow cooker. Stir, cover, and
cook on low all day.
3. About 30 minutes before serving, stir in the rice.
4. Remove the bay leaf before serving. Offer hot sauce at the table.

Wasn't that easy?
Bookmark and Share

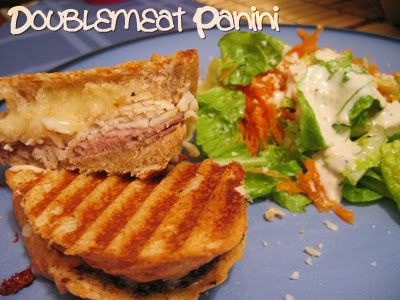
I'd say the inspiration is pretty obvious, wouldn't you? I felt so clever when I came up with it. I used a panini press, but you don't really need one. Just make sure you press down well with a spatula and cook it like a grilled cheese. Or you can just go crazy and use two pans like Alton Brown does. Crazy dude. *hearts* I ate the panini with a salad and called it dinner, but they also make for tasty finger food - depending on the bread, of course. Skinny baguette=finger food. Big fat round loaf=meal.


Ingredients:
French bread, sliced diagonally
Olive oil
Provolone cheese, either sliced or shredded
Roast beef
Chicken breast
Sundried tomatoes
Caesar salad dressing

Directions:
Chop up the tomatoes very finely and mix with the caesar dressing.
Brush the bread on one side with olive oil.
Assemble the sandwiches thusly, from bottom to top: bread (oil side down), tomato/dressing concoction, beef, chicken, provolone, bread (oil side up).
Place on a pre-heated panini press or skillet over medium to medium-high heat and cook until bread is toasted and cheese is melted. 3-5 minutes on the panini press.
Bookmark and Share

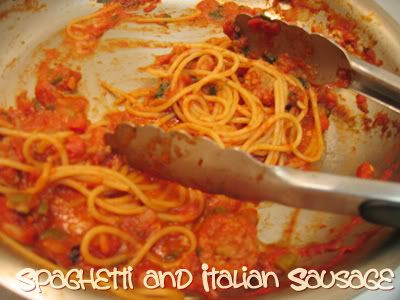
Recipe: Spaghetti and Italian Sausage

This post is really just an excuse to teach you how to make tomato sauce. Though Italian sausage is certainly a yummy way to augment your tomato sauce. I confess that I do not often make my tomato sauce. I don't know why. You can make it in giant batches for way cheaper, especially if you use herbs from your garden. Unfortunately, a batch large enough to use an entire package of fresh herbs would be ridiculous. Alternatively, you could also use dried herbs, but it won't taste as good. Seriously, plant an herb garden. Basil, oregano, and thyme are great and quite versatile. I could eat basil straight off the plant. Seriously.

Okay, so I don't actually have an herb garden right now. We're moving from an apartment to a house in less than a month, and it would be a serious pain to move it. I want one so bad. :( I got the herbs from my very first CSA box. The basil was so beautiful I could cry.

So, how do you make tomato sauce?

You can make a basic tomato sauce with just olive oil, garlic, onion, and tomatoes. You saute the garlic and onion in the olive oil. (Most recipes require you to sweat the garlic and onions, meaning you cook them slowly until they turn transparent without letting them brown. I like sauting better. Letting the onion get a little bit of color makes it more flavorful.) Then, you add the tomatoes and simmer. You can augment it by adding bell pepper (with the garlic and onions), oregano, thyme, basil, and/or parsley (at the end), and/or crushed red pepper (whenever, pretty much). I put all of these in my tomato sauce, and I am glad to say that my husband said it was his favorite. I use a mixture of diced and crushed tomatoes because I like the consistency of the sauce at the end, but you can use any that you want. Or even fresh ones.


Tomato Sauce

Ingredients:
2 T olive oil
2 cloves garlic, minced
1/2 medium onion, diced
1/2 green bell pepper, diced
1 15 oz can diced tomatoes
1 28 oz can crushed tomatoes
enough fresh basil, thyme, oregano, and parsley for a handful (about 1/4-1/3 c)
1 t red pepper flakes

Method:
1. Saute the garlic, onion, and bell pepper in the olive oil over medium-low to medium heat until the onions are transparent.
2. Add the tomatoes and simmer over medium-low heat for 20-30 minutes.
3. Just before serving or storing, add the herbs and red pepper flakes. You just want the herbs to wilt before serving, no more, especially if you're storing it to serve later. I freeze tomato sauce in a muffin tin and then transfer the sauce to a ziptop bag.

To make the spaghetti and italian sausage, cut up one link of sweet italian sausage into bite sized pieces (or use bulk sausage). Brown the sausage over medium-high heat (use a little oil or non-stick spray) until cooked. It shouldn't take long, maybe three minutes. Add 1 1/2 c of sauce, and heat through. Meanwhile, boil 1/2 lb of spaghetti in salted water. When the pasta is done, drain and toss with the sauce.
Bookmark and Share

Recipe: Pasta Salad

Dressing:
1/4 c extra-virgin olive oil
2 T balsamic vinegar
1 clove garlic, minced

Salad:
3/4 lb cooked pasta (I used bowtie. Fusili or penne would also be good.)
2 oz pepperoni, cut into bite-sized pieces
2 oz provolone, cubed
1 cucumber, peeled, quartered and sliced
A few grape tomatoes, kalamata olives, and pepperoncini, cut into bite-sized pieces
1 sun-dried tomato, cut into bite-sized pieces

Method:
1. Whisk together vinegar, oil, and garlic until it has a uniform consistency. You don't need to bother drizzling the oil into the vinegar.
2. Toss dressing with the rest of the ingredients.

Most of the time taken by this recipe is taken by cutting stuff up, which can be done while the pasta cooks. If you cook the pasta while you're prepping the rest of the ingredients, rinse the pasta in cold water before adding it to the rest of the ingredients so it's easier to work with.